3. Basic page
Basic pages and structured pages will form the majority of general content pages on your site.
The basic page offers the simplest type of page and is suitable for:
- a single topic
- content that can be displayed to the user in a single view.
For the basic page topic, there are 3 tasks, each of which require the following:
- Create a basic page.
- Complete the instructions for each basic page
- Publish the basic page
After completing each basic page, there is a review stage that consists of the following:
- Compare your published basic page with the Review associated with the task.
- Review Training page 2 on your training website where a view has been inserted to display basic pages that have the tag, sample basic page, added.
Learning outcomes
At the end of the topic, you will be able to:
- Create a basic page
- Insert content
- Insert links
- Insert in-line images
- Apply best practice to edit content
- Use the WYSIWYG editor
- Publish content.
4. Review: insert links
Compare your basic page with the following:
- Published basic page
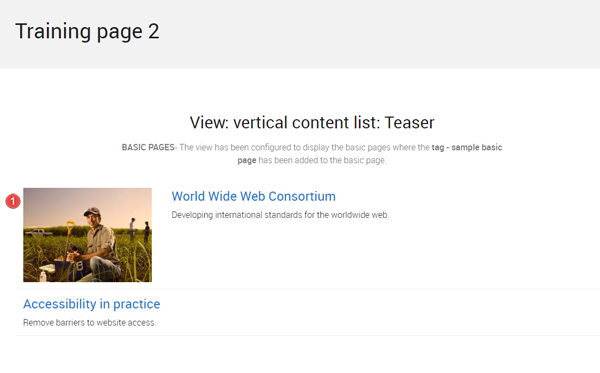
- Display of information in a component on Training page 2 - view: vertical content list:teaser
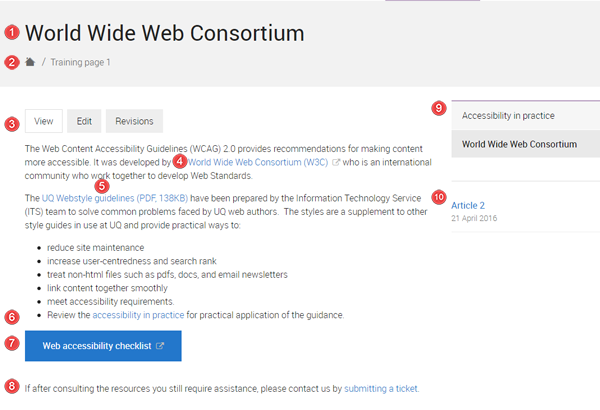
Published basic page
The numbered information that follows refers to the image below.
- The page title is styled as heading 1 (H1) and the headings in the body field can range from H2 to H6.
- Breadcrumb - the breadcrumb appears because the menu link was added to the basic page via the Menu options when creating the basic page.
- Page tabs
- View - displays the published page
- Edit - editable version of the page.
- Revisions - list of saved versions of the page at different times.
Links
- Descriptive link text that provides context for the link is critical. Individuals who use screen readers may scan links by tabbing from link to link and therefore the link text must make sense out of context.
- The default behaviour when a user clicks a link is that the link location opens in the same page. The benefit of maintaining this default behaviour is that:
- if the link opens in the same page, the functionality of the back button is maintained and the user is able to return to their original location by clicking back.
- the user is able to decide whether to open the link in a new tab or new window when they right-click a link. If you change the default behaviour forcing the link to open in a new tab, the user loses the choice about where the link will open.
- Link to an external website. When inserting external links, insert the class:
link--external
See the video, Add external link class. - Link to a document
- Link to an internal path
- Button linking to an online accessibility checklist
- Link to an email message.
- Menu links to sibling and children pages.
- Related content - hyperlinks to internal content.
Component display on Training page 2- view: vertical content list: teaser
Purpose: to show you what happens if you tag your content. This view has been configured to display the teasers of basic pages where the tag - sample basic page has been added.
If you add a teaser image to your basic page, the teaser image will be displayed along with the hyperlinked title and summary for your basic page.
![]() The basic page, World wide web consortium, was published.
The basic page, World wide web consortium, was published.
- the teaser for the basic page appears in the vertical content list: teaser because the tag - sample basic page was added to the basic page.
- image displays because a teaser image was added to the basic page.
Checklist: UQ Drupal Fundamentals
Avoid using Microsoft Edge or Internet Explorer for Drupal training.